

A rifle that prints tight groups at 100 yards can come apart fast once distance stretches. At that point, small setup errors stop looking small. A slight shift in the optic, a twisted tube, or an inconsistent head position can turn a solid zero into misses that seem mysterious but are usually mechanical or positional. The most common culprit is not the cartridge, barrel, or even wind judgment. It is the mounting system and the way the shooter interfaces with it. Past 300 yards, repeatability matters more than appearances, and a scope that is merely “tight” is not necessarily stable.
1. Treating torque like a guess instead of a measurement
The fastest way to undermine accuracy is tightening scope hardware by feel. Under-torqued screws can let bases and rings creep under recoil, while over-torqued ring caps can crush the scope tube and stress the erector assembly. That combination often shows up as wandering zero, random flyers, or adjustments that stop behaving predictably. Reference guidance on wrong torque and inconsistent torque points to the same pattern: the rifle is often fine, but the aiming system is not returning to the same place after every shot. Factory torque specs and an inch-pound wrench matter because they create consistent clamp force, not because they make the setup look professional.

2. Mounting onto dirty or oily threads
Torque values become misleading when threads are contaminated. Oil, solvent residue, old thread locker, grit, and machining debris can all change how a screw feels before proper clamping force is achieved. A mount can seem secure on day one and still start moving after a few range sessions. This is one of the classic “it used to shoot better” problems. Clean threads, properly seated screws, and correctly cured thread locker are basic details, but they directly affect whether the zero survives recoil and temperature changes.
3. Using screws that bottom out before the base clamps
A screw that reaches the bottom of its hole can feel tight while doing almost no real work. The base may appear seated, yet it is only one recoil cycle away from shifting. At distance, that tiny movement becomes a measurable point-of-impact change. The warning sign is abrupt resistance before the base truly pulls down. Proper screw length is not a cosmetic detail. It determines whether the optic base is actually clamped to the rifle or merely touching it.
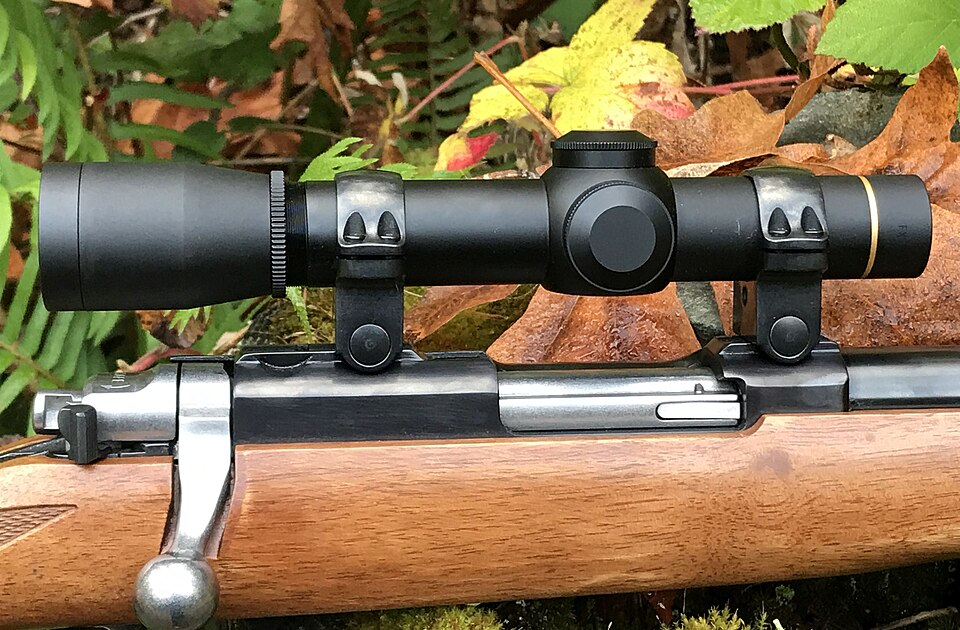
4. Bending the scope tube with misaligned rings
A scope tube is not meant to act like a bridge between imperfect parts. If the rings are out of alignment, tightening them can bend the tube and preload the internals. That mechanical stress can create erratic tracking, poor return to zero, and groups that open without any obvious explanation. According to misaligned rings and scope tube stress, larger optics and wider ring spacing can make the problem more obvious. Uneven ring marks, unusual resistance during installation, or a tube that seems to spring when loosened are all signs that the optic is being forced into place.
5. Uneven ring cap gaps that twist the reticle
Even with correct torque, uneven tightening can rotate or twist the scope in the rings. That does more than create an annoying visual mismatch. It can produce reticle cant, inconsistent return after recoil, and ballistic holds that no longer line up with the target path. This matters more as range increases. At closer distances, a slightly canted reticle may hide inside the group. Beyond 300 yards, it starts to distort vertical correction and wind holds in ways the shooter can actually see on paper.
6. Mounting the scope at a height that ruins head position
Some accuracy problems are not caused by loose hardware at all. They come from a scope setup that forces the shooter to float the head, crane the neck, or hunt for the eyebox. When cheek weld changes from shot to shot, parallax and sight alignment change with it. A stable rifle still needs a stable shooter interface. The best mounting height is the one that allows a repeatable cheek weld and immediate full sight picture, not the one that simply clears the barrel or looks streamlined.
7. Ignoring rifle cant because the zero looks fine at shorter range
Cant is easy to dismiss when a rifle is used mostly at modest distance. The error becomes harder to ignore as bullet drop increases. A tilted rifle changes the geometry between line of sight and bullet path, shifting impact away from the expected point. As explained in rifle cant and point-of-impact shift, the problem is driven by angular displacement rather than scope height alone. A bubble level on the rifle or scope rail is a simple way to remove one variable that grows with distance.
8. Confusing short-range zero with long-range readiness
A rifle that is merely on paper at 100 yards is not automatically sorted for 300 and beyond. Longer shots demand confirmation of actual trajectory, not assumptions. Some shooters prefer to establish a practical zero farther out because it simplifies holds across a wider distance band. Outdoor Life noted the value of sighting in at 200 yards for a more useful field zero. Whatever zero distance is chosen, the critical step is confirming it at the ranges where misses begin to matter.
9. Blaming the rifle when the real issue is shooter input
Past 300 yards, setup and technique overlap. Poor breath timing, a jerky trigger press, weak follow-through, and unstable support can mimic equipment failure. One reference on shooting fundamentals states, “Following through prevents you from jerking the gun before the bullet has left the barrel.” That is basic advice, but it becomes more important as targets get farther away and time of flight increases. Support choice matters too. A bench can hide problems that reappear when the rifle is shot off bags, packs, or field rests. The farther the shot, the less forgiving the system becomes.
The setup mistake that ruins accuracy past 300 yards is rarely one dramatic failure. More often, it is a stack of small errors in torque, alignment, cant, and shooter fit. Each one might be survivable at 100 yards. Together, they unravel a rifle once range starts magnifying everything. That is why precision starts before the first shot. A correctly mounted optic, level reticle, confirmed zero, and repeatable shooting position do more for long-range accuracy than chasing a different load or blaming the barrel.

